Weighted Vest Safety Tips

The Nitty-Gritty: What You Need to Know
Safety First: Weighted vests intensify workouts but also increase stress on joints. Proper use prevents injuries, as studies show recreational use doesn’t inherently increase injury rates.
Start Light: Begin with 5-10% of your body weight. For a 150lb person, this is 8-15 lbs. Overloading can lead to poor form and injury.
Proper Fit is Crucial: A snug, evenly distributed vest prevents shifting, discomfort, and balance issues. Adjust straps and weight blocks symmetrically.
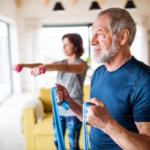
Beginner-Friendly Exercises: Start with low-impact exercises like walking, squats, lunges, push-ups, and planks. Avoid high-impact or technical moves initially.
Gradual Progression: Increase weight slowly (e.g., 2-3 lbs every 2 weeks) or increase reps/duration before adding more weight.
Listen to Your Body: Watch for joint pain, poor form, or prolonged fatigue. These are signs to reduce weight or rest.
Prioritize Recovery: Include vest-free days, hydrate, and maintain good nutrition to support muscle regeneration.
Feeling excited to amp up your workouts with a weighted vest? You’re not alone – these vests have surged in popularity, from casual walkers to hardcore athletes. They can turn simple exercises into calorie-torching, muscle-building sessions. But before you strap on that extra load, let’s chat about safety. As your experienced friend in fitness, I’m here to share how to get the gains without the pains. Weighted vests can be safe and super effective – if you use them right. Here are some warm, down-to-earth tips on weighted vest safety for beginners and seasoned pros alike.
Why Weighted Vest Safety Matters – Risks & Misconceptions
Wearing a weighted vest is basically strapping extra you onto your body. This intensifies your workout, which is great for strength and endurance – but it also intensifies the stress on your muscles and joints. Do it wrong, and you could be looking at strained knees or a sore back. In fact, jumping in too fast with a heavy vest can put excess strain on your ankles, knees, hips, and spine, according to experts. The good news? Used correctly, weighted vests don’t seem to cause a spike in injuries for everyday exercisers. Studies so far haven’t reported an overall increase in injury rates from recreational vest use. This means that the vest itself isn’t inherently dangerous – it’s all about how you use it.
That said, a big misconception is thinking “I’ll just throw on a vest and double my workout intensity – more weight, more results!” Wrong. More weight can mean more risk. If you overload yourself from day one, your form can go out the window and your risk of injury shoots up. Another myth is that you need to wear it for hours on end to get benefits. In reality, wearing a vest for too long or with too much weight can lead to fatigue, sloppy technique, and aches. One clinical study even found that people with obesity who wore heavy vests for extended periods had a higher incidence of back pain.
Bottom line: weighted vests work best in moderation. Safety matters because it’s the difference between getting stronger and getting hurt. As with any exercise tool, the risk stays low when you progress gradually and use good technique.
Personal insight: I remember the first time I tried a weighted vest – I optimistically tossed a 20-pound vest on and went for a run. Let’s just say my joints were not amused. I learned quickly that slow and steady is the way to go. Don’t be me; ease into it!
Choosing the Right Weight – Start Light, Not Like a Superhero
One of the biggest safety factors is how much weight you’re lugging in that vest. It’s super tempting to go for the heaviest vest you can find, especially when you see ripped athletes training with 40+ pounds. But for us regular folks (and even most athletes), that’s usually overkill at the start. The golden rule many follow: start with about 5–10% of your body weight. In practical terms, if you weigh 150 lb (68 kg), that’s an 8–15 pound vest max to begin. In fact, some experts suggest sticking to the lower end of that range (5% body weight) initially and only going up toward 10% after your body has adapted over a few weeks. This range is heavy enough to give you a boost in calorie burn and intensity, but light enough to keep your form clean and joints happy.
Don’t worry, 5–10% might sound small, but you’ll feel it. Many first-timers are shocked at how challenging even a 10-pound vest feels. One person on a fitness forum confessed, “I could not believe how heavy ten pounds felt when wearing the vest… I was in disbelief. Start slow.”. Your body needs time to adjust to carrying extra load. If you pile on, say, 30% of your body weight right away, you’re likely to compensate with bad posture or movements, which defeats the purpose and invites injury. Remember: a weighted vest isn’t about instant macho points; it’s a training tool for gradual improvement.
What not to do: Don’t assume “more is better.” Loading a 50 lb vest on day one won’t magically turn you into a superhero – it’s more likely to tire you out and make your form sloppy. Also, don’t jump from zero to hero overnight. If you’ve never used a vest, start on the light side and see how your body responds over a couple of sessions.
Feeling good? Great – you can always add weight later. Feeling achy or off-balance? Scale it back. One user recommended adjustable weighted vests for exactly this reason: you can “start very light and gradually increase to a max of around 10% of your body weight” over time. That flexibility is key. Lastly, resist the urge to wear the vest for every exercise or for excessively long periods when starting out. It’s a tool, not a permanent appendage – use it strategically for short bouts or specific exercises to begin with, rather than a 3-hour marathon. Trust me, your shoulders and back will thank you.
shorten each paragraph
Proper Fit and Wear – Strap In for Success
A well-fitted weighted vest should hug your torso snugly, distributing weight evenly across your shoulders and core. Keep it secure to avoid shifting or bouncing during exercise.
How you wear a weighted vest is crucial for an effective workout. A snug, secure fit prevents the vest from flopping around, which can throw off your balance and cause injury. Adjustable straps or Velcro on quality vests help achieve this comfortable, yet firm, lockdown.
Even weight distribution is key. Load weight blocks symmetrically and ensure the vest keeps the load close to your core and across your shoulders. Poor distribution, especially if weight hangs from one area or puts pressure on your shoulders, can lead to discomfort and poor posture.
Before exercising, adjust the vest to sit high on your torso (upper to mid-chest level) to avoid lower back strain. Secure all straps and clips, then do a few test movements to check for shifting. Wear a form-fitting, sweat-wicking shirt underneath to prevent chafing. If the vest feels like it’s clunking or altering your movement, refit it.
Always fix a slipping vest immediately during a workout. A properly fitted vest not only ensures safety by maintaining control and good posture but also enhances performance by keeping resistance where it should be. Taking a moment to adjust your vest before each session is well worth it.
Exercises to Start With – Low-Risk, Beginner-Friendly Options
Alright, you’ve got your vest and it’s fitted nicely. Now, what should you actually do with it? The key for beginners (and really, anyone new to weighted vests) is to start with simple, low-impact exercises. The vest will make even basic moves more challenging, so you don’t need to get fancy right off the bat. In fact, some of the best exercises to begin with are ones you’re probably already comfortable doing with just your body weight.
Walking – Yes, plain old walking is phenomenal when you add a weighted vest. It’s a low-impact way to get used to the feeling of extra weight. Try a 10-20 minute walk around your neighborhood or on a treadmill with a light vest. You’ll ramp up your heart rate and calorie burn more than regular walking, without overly stressing your joints. In one study, postmenopausal women who walked with a light vest (only ~4–8% of their body weight) three times a week improved their fat loss and muscle gain compared to those who didn’t wear vests. That’s encouraging evidence that even gentle exercise with a modest vest can yield benefits. As you get comfy, you can increase your pace or distance, or find a slight hill for extra challenge. But stick to walking before you even consider running; many folks find that jogging with a vest is significantly harder, so build that foundation first.
Bodyweight exercises – Another great starting point is doing basic calisthenics with the vest. Moves like squats, lunges, push-ups, and planks are excellent choices. You’ve hopefully mastered these with just your body weight; the vest will crank up the intensity a notch. For example, doing a set of 10 squats with an extra 10 lbs on you will make your legs and core work noticeably harder. Similarly, push-ups with a vest add load to your upper body, effectively increasing the resistance. Keep the exercises simple and low-risk: think squats (sit back and keep that form sharp), stationary lunges or step-ups (great for legs, just watch your balance), push-ups (you might do fewer reps with the added weight, and that’s okay), or planks (the extra weight makes your core stabilize more). These movements are controlled and slow – perfect for feeling out the vest. A weighted vest pairs perfectly with such exercises, essentially turning bodyweight moves into weighted moves. Even just holding a plank or doing gentle yoga-style flows with a vest can engage muscles more than usual.
If you’re more of a cardio person, you can also incorporate the vest into low-impact cardio routines. For example, wear it during an indoor cycling session or on the elliptical (if it fits comfortably) for an added challenge without the pounding on your knees. Some people even wear a light vest while doing household chores or dancing around – it all adds up, though for beginners I’d suggest sticking to deliberate exercise time so you can pay attention to your body’s signals.
What to avoid at first: High-impact or highly technical exercises. That means no plyometric jump squats, no sprinting, no intense HIIT moves with a vest until you have some experience. Those amplify impact forces dramatically with added weight. Also, be cautious with any overhead movements. For example, doing pull-ups or overhead presses with a heavy vest can be tricky – the extra weight might throw off your balance or put a strain on your lower back if you arch. You can work up to those once you’re confident, but they’re not “Day 1” exercises. Keep it straightforward initially. Think of the vest as a way to turn up the dial on exercises you already handle well. If you wouldn’t do a move unweighted, definitely don’t try it weighted.
One more beginner-friendly routine: stairs or step-ups. Climbing a few flights of stairs or stepping onto a sturdy bench with a vest on is a fantastic way to get your heart pumping while strengthening your legs. It’s basically mimicking hiking with a pack. Just use the handrail if needed and go at a steady pace – don’t race up the stairs yet. As always, focus on good form (e.g. knees tracking over feet, not wobbling).
To sum up, start with exercises that are familiar and inherently safe. Walking, squats, lunges, push-ups, and planks are all great choices to feel out your new “portable weights”. These will build your confidence and foundational strength. Once these feel easy with your starter vest weight, you can slowly venture into more complex or dynamic moves – which brings us to progressing safely.
Progressing Safely – How to Level Up Wisely
Once your weighted vest workouts feel too easy, it’s time to progress, but do so gradually. Allow your body at least two weeks to adapt to a new weight before increasing it further. Small increments, like 2-3 pounds, are best, allowing muscles, tendons, and ligaments to adjust.
Beyond adding weight, increase intensity by doing more reps, covering longer distances, or adding an extra workout day. Adapt to one new stimulus before stacking another. Gradual increases in workload, whether through weight, distance, or time, are fundamental to fitness improvement.
Watch for signs of overuse or overtraining, such as persistent joint pain, sudden sharp pains, or deteriorating form. Extreme fatigue or unusually long recovery times also signal you’ve progressed too quickly. Always listen to your body and reduce weight or rest if you experience discomfort.
When increasing weight, do so in a controlled manner, adding small, balanced increments. It’s normal to feel a difference, but not extreme discomfort. Gradual progression prevents injuries and supports long-term gains.
Finally, prioritize rest and recovery. Include vest-free days, hydrate, eat well, and consider stretching or foam rolling. If you overdo it, back off, recover, and resume with a more moderate plan. Progression with a weighted vest is a slow, mindful process of small, consistent steps.
Weighted vests can be a game-changer for your fitness routine. They add a friendly kick of resistance to help you burn more calories, build strength, and even improve bone density over time. But the real secret sauce is using them wisely. By understanding why safety matters, choosing an appropriate weight, ensuring a proper fit, starting with beginner-friendly exercises, and progressing at a reasonable pace, you set yourself up for success. Think of your weighted vest as a trusty workout partner – one that challenges you but also needs you to be attentive and responsive. Treat it with respect, and it will reward you with results.
Your Burning Questions, Answered!
Is wearing a weighted vest safe for beginners?
Yes, weighted vests can be safe for beginners if used correctly. Start with a light weight (5-10% of your body weight) and focus on proper fit and low-impact exercises.
How much weight should I start with in a weighted vest?
A good starting point is 5-10% of your body weight. For example, if you weigh 150 lbs, begin with an 8-15 lb vest. You can always add more weight gradually as you get stronger.
How do I know if my weighted vest fits properly?
A well-fitted vest should be snug but not restrictive, hugging your torso evenly. Ensure the weight is distributed symmetrically and the vest sits high on your upper to mid-chest. It shouldn’t shift or bounce during movement.
What are the best exercises to start with when using a weighted vest?
Begin with low-impact, familiar exercises such as walking, bodyweight squats, lunges, push-ups, and planks. These allow you to get accustomed to the added weight safely.
How quickly should I increase the weight in my vest?
Progress gradually. Allow your body at least two weeks to adapt to a new weight before adding more. Small increments of 2-3 pounds are recommended. You can also increase reps, duration, or frequency before adding more weight.
What are the warning signs that I’m using too much weight or overtraining with a weighted vest?
Look out for persistent joint pain (knees, ankles, back), sudden sharp pains, a breakdown in your exercise form, extreme fatigue, or unusually long recovery times. If you experience these, reduce the weight or take a break.
Now strap in (comfortably!), stay safe, and enjoy the journey to a stronger you. Happy vesting!